Showing posts with label DIY. Show all posts

Friday, January 9, 2015

Christmas 2014


Merry {belated} Christmas everyone!
Today I am finally taking down our Christmas decor, so I figured it was about time I shared our Christmas on the blog! We had a wonderful Christmas this year, my parents and brother visited and it was the most wonderful gift of all.


This year I really wanted to put some of our childhood ornaments on our tree,  so I tried to incorporate those while still having a "pretty" tree. I think it's my favorite tree so far. I found the Rudolph sign came from a local store that sells handmade items from local craftsman. I am so excited to decorate around it next year!


Since my parents were visiting, I wanted to make sure the coffee and hot chocolate were readily accessible. So I came up with this hot chocolate bar! I really love sprucing up this area for every season. I'm already brainstorming for Valentine's day!


My mini tree is something I've had since I was a little girl. I loved having it displayed this year with some of our childhood ornaments. I put it in a planter so that it could have a bit of height. It doesn't match perfectly, but I love it anyway.


Hope you all had a very merry Christmas with your families! May 2015 bring everything you're hoping for!


Saturday, August 9, 2014

Vintage Sofa Revival


This reveal has been a year in the making, but it was oh so worth it.
I first acquired this beauty while we were stationed in North Dakota, from a very generous friend. For the first few years, the sofa maintained her original upholstery and cushions. But after some wear and tear from our move to Washington and some incidents with a naughty dog, it was time to give her a makeover.


While my husband was deployed last year, I stayed with family in California, and brought her along. I'd never recovered something quite so huge before (Ok, more like I'd never recovered more than a dining room chair!) and knew I would need some backup in the form my insanely talented mother. Together, we tackled removing all the fabric, cushioning, and the millions of staples that held it all together.


The photo above was at what was the scariest part of all. The staples were taking forever and the reality of what I had undertook was finally sinking in. At this point I semi-seriously considered listing the sofa on Craigslist under "free."


Thankfully, I persevered and when we finally got down to the stuffing, we stopped. I left the original stuffing on the back and sides since it was still in good shape and would cut my work time down. I'm so glad I did.


 After filling, sanding, and re-staining the frame, the fun part finally came! And by fun I mean crazy stressful and frustrating. My first hurdle was trying to get the color of the fabric right. I used two drop cloths from Lowe's as my upholstery fabric. I'd wanted a dark grey, so I used RIT dye to change the color of the drop cloths. But after trying to adjust the color a few times I gave in and said good enough. I ended up with a grey-blue color instead, but I'm still pretty happy with it.

My next hurdle was the tufting. It took three tries to get the back right, but you'd better believe I'm a whiz at tufting now!


I did not take progress photos, I had meant to at one time, but to be honest, this took all my attention. I found some really great tutorials though that I will post at the end.
After this stage...it sat. And looked like this for about six months before I found out we would be moving again and knew I needed to finish it once and for all!


 The back and sides were incredibly easy after the tufting of the front, still challenging in it's own way, but the process took much less time.


 For the cushions I used the high density foam that Joann Fabric's carries. It is incredibly expensive, but if you use a half off coupon it really helps cut down on the price. This is obviously not the best photo of it, but it is the green rectangle in the back of the photo. It's super comfortable!


The trim is also a Joann's find, and I was very lucky with how closely it matched my fabric, which I'll talk about more at the end of the post. Gluing it on took forever, but it really finished it off and is preventing the fabric from fraying!


Remember how I was saying my mom is insanely talented? She made the beautiful cushions for me. She made the piping to match, and then sewed them up nice and straight. I could never have done such a great job!


Since I didn't take photos of my own to share, I thought I would share the tutorials I used to help me with the dying and tufting processes. I have a Pinterest board full of inspiration here, but the ones below are my favorites.

For dyeing the drop cloth, this tutorial from Sunnyside Up-stairs using RIT dye was a favorite.

For the tufting, I found the tutorial from Blue Roof Cabin and the links she provides to be the best. There is a video called Kim's Upholstery that was excellent in helping me figure out how tufting works.

And while I ended up not sewing the cushions myself, this tutorial from Smart Girl Style for professional looking cushion covers was a great read and I will definitely be using it for future projects!


I hope you all enjoyed seeing my not-so-little project. 
This sofa was really a labor of love, but I am so glad I finished it and am now able to enjoy it in my living room! Well, until we move that is!
 My next project will be making a cover and pillowcases for the loveseat! I found that lovely piece at The Farm Chick's show in Spokane, WA! I can't wait to share it in more detail once it's all spruced up!
 Until next time!

Thursday, April 3, 2014

A Fairy Garden Party


Hello all, I am so excited to finally share another party!
This was a very special event, planned especially for my dear mother's 50th birthday.
For Christmas, my gift to her was a fairy garden that we designed together, and that acted as my inspiration for the party theme. Everything was a total surprise for her, including my visit ( I live in another state from my parents), and it was so much fun to plan this all for her without her knowing.
But let's get on to the photos!


My number one goal for this party was that it had to be budget friendly. Because of this, coupled with the fact that I couldn't bring anything with me from my own party/craft supply, I had to get creative with the decor. The easel above was a chance find, stored away by a folding table we pulled out for seating. It made the perfect sign to welcome guests. The fact that my mom collects gnomes and displays them on her porch helped quite a bit. ;)


Growing up I wanted a "princess" bed, including a canopy. My mom actually made the purple canopy pictured above out of a few yards of tulle, a metal embroidery hoop, ribbon, and a chain of flowers. It was a simple project that didn't cost a lot and has served us well over the years. I was so glad to have found it among my things that still "live" at my parents home.


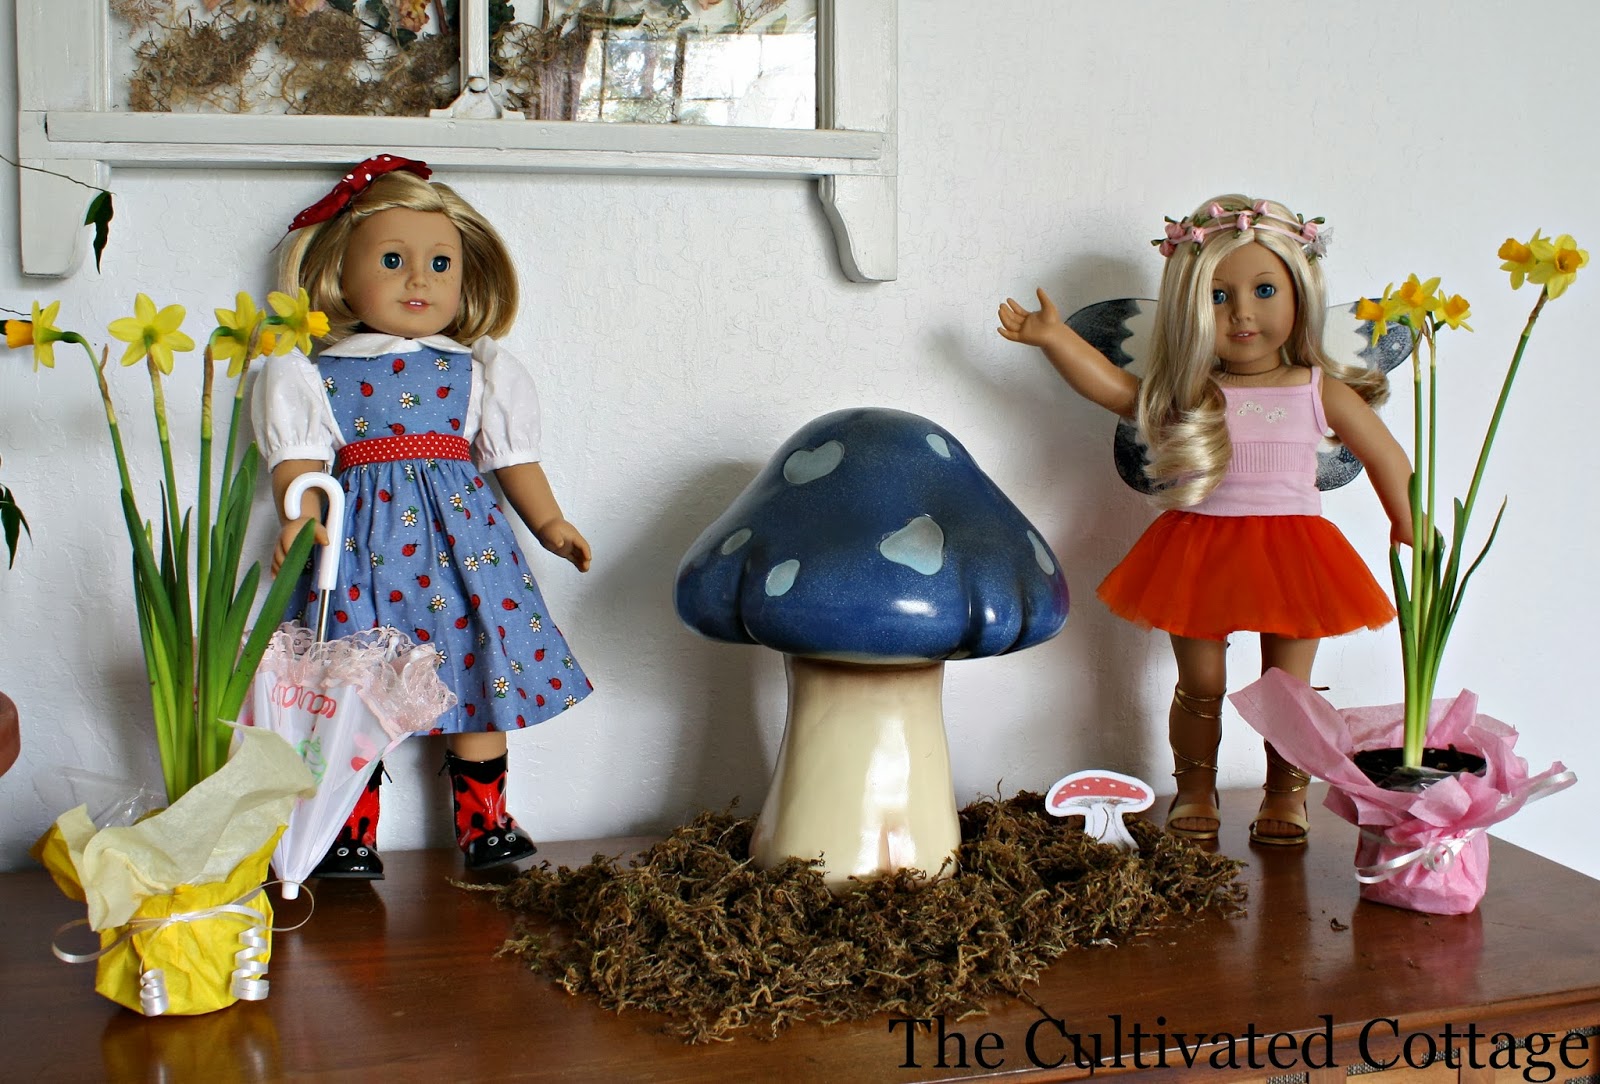
If you've seen my other party posts, you will notice American Girl dolls are a favorite for my mom and I. This little vignette was probably my favorite to create. I simply dressed the dolls up, one in a cute garden themed outfit, and the other in a collection of items that gave her the look of a fairy. Her wings are actually a butterfly I had hanging on the wall of my room growing up, that I simply tucked into her shirts back. The mushroom is yard art from Lowe's that was brought in the house specifically for the party.


This is the fairy garden that inspired the whole party! It too was made up of new, old, and sentimental items. The tree-like plant in the background was one I used to have in my bedroom growing up (It must be close to 10-12 years old at least by now!), we also used glass from one of our visits to Glass Beach, and stones from a project I had done in high school.


Isn't she sweet? Her crown of flowers was actually one I wore for a wedding I attended as a child! It's all about re-purposing things you already have in new ways! Sometimes it can feel overwhelming when planning a party. Costs start to add up quickly, and it makes having a cute theme seem hard. But as this party goes to show, if you look around at what you already have and plan around that, it can help stretch a budget a long way.


This statue wasn't what I had planned on gifting my mother, but when I saw her I realized I wanted my mom to have a reminder of her special day, and this little figurine seemed just right.


Pictured above, the only items purchased were the streamers, table clothes, and flowers. The lanterns were from my wedding, and the other canopy was another I had growing up. Just those few things made such a huge statement and really added to the party.


Believe it or not, the mushroom banner is actually just a streamer that I used as a base to tape free mushroom printouts on. I simply printed, cut, taped and hung. All inspiration and printables for this party can be found on the Pinterest board I created here. Those amazing (but quite time consuming) white fluffy garlands, that are also hung on the wall, came from Party City! I highly recommend them, they add so much to the space. 


The plastic table clothes were stunning and from Winco Foods of all places! I was blown away by their cute party decor.


We carried the theme into the adjoining dinning room. My aunt and brother supplied all the lovely flowers in the photos.


The cupcakes were actually a bit of a DIY fail for me! I wanted them to look like mushrooms and ended up with these. They are still cute, just not quite what I had envisioned! The original idea can also be found on my Pinterest board, linked above.


Small details, like a flower garland in the chandelier, carry the theme into the next room. It doesn't take a ton of decor to carry a theme. All you really need are one or two focus areas, like the dolls vignette and the front door, and then a few items through out the space you'll be entertaining in to carry out the theme.


Isn't this bunny precious? My mom loves all the sweet animal figurines and keeps her favorites in the house. This little bunny and her twin fit right in with our party. The moss you see pictured here was a single package that was added in to add to the garden look.


Last but not least, a last few detail shots of fun things, such as the coordinating cake, and the headdress I rediscovered and used down below.


And there you have it, an adorable party that came together because of creativity and imagination. I loved being able to do this for my mother, and I loved having another chance to plan a party! They can be so much fun if you don't let the pressure of having things perfect get in the way. I hope you all enjoyed the photos and that you too can be inspired to look around you and get creative when it comes to putting something like this together. Thank you for visiting!


Friday, October 11, 2013

DIY Redneck Party


Heys everybody! We's havin' ourselves' a lil' redneck partay!
Won't yous come n join us?!

Okay, okay, I'll stop the hill billy talk. ;)

For my brother James' 19th birthday, he just wanted a low key, hangout with his friends and family kind of day. But since it was his special day, I couldn't just not help him celebrate, so I worked on setting the mood!
The idea we agreed on was to keep the party stress free, cheap, and totally guy friendly. We found some awesome ideas that inspired us on Pinterest and you can check them out on my redneck themed Pinterest board. From there we took a little creative license to make the ideas our own, and a budget friendly, laid back, and fun party theme was born!


 While brainstorming ideas, I kept going back to your typical "redneck" stereotypes and how we could easily incorporate those things to give our party the right vibe. One of the best ideas I came up with was your everyday clothes line. Now lots of folks use an outdoor clothes line, especially in the summer! There is no shame in that, but it did fit our theme and made such a huge statement! To take it a step further we used clothes from the "rag bag," which were all items too torn, stained, old, etc, to wear. Nice clothes just wouldn't have the same impact.


Remember when singing fish were popular? Luckily my parents still had theirs, because these were the PERFECT addition! They sung, they moved, and every time someone walked by and didn't realize they were on, was priceless. Don't be afraid to take this party to the level of extremely tacky, that's what it's all about! Not that singing fish are tacky or anything. ;)


Pinterest was a direct influence on this one. When I saw the "Cat Found!" poster, I knew we needed to have our own version. We also took it a step further and put out the kennel the "cat" supposedly resided in. It just added a little something extra to the decor that we already had on hand. Finding everyday things that fit the need is what this idea is all about!
 

Did you think the possum fun ended there? Nope! We printed out this hilly billy version of the classic "Pin the tail on the donkey" and when we accidentally left out an S, we just rolled with it and left it like that. Duct tape also adds to the authenticity.


Now I'm sure you're wondering about the wheelbarrow from the top photo. While we saw wheelbarrows used in many different ways, this one worked for us best- as a drink station! We added the tub in the middle since the wheelbarrow itself has a nice hole in the bottom, but it worked perfectly as a stand! And who cares about tossing out the cans? Just throw them on the ground to add a touch of "trashy" to your decor.

Psst!...See those undies in the background? They make me giggle every time I see this picture. :)


Now every yard should have a bird feeder for the sweet little birdies to visit. Ours just happens to be a plunger! Works perfectly doesn't it? And when the party is over, just leave the food for the birds to find, and put that plunger back to ah...it's intended use!


Speaking of potty humor, you know what makes a great planter? A toilet. As it just so happens, my good old Dad is a plumber and had a few old pots that we could use for this event. But don't forget the flowers, this is a classy event, only the prettiest flowers for our potties!


Not everyone is going to have a spare toilet laying around, so for those who don't (or are too squeamish to use one), one of the best games we played was toilet seat toss. It's exactly like a game of Horseshoes, but with a toilet seat! Everyone loved this game and to play, all your need is a *new* toilet seat and something to toss the seat around/at. Much cheaper and definitely cleaner!


 Any country music lover knows the song Red Solo Cup, by Toby Keith, and my brother (pictured above), is no exception. The newest trend mixes the ever classy solo cup and a candle stick holder to make this bad boy of a beverage holder. I DIYed this one with a reusable red solo cup from Bed Bath & Beyond and a candle stick from a local Dollar Store. A little epoxy to hold the two together and you've got yourself one heck of a redneck red solo cup! It made an excellent birthday gift to one very happy dude.


 So you're probably wondering why there is a soda box instead of a piñata. Well friends, our "redneck piñata" was cheaper and way more fun. We stuffed a soda box with just about anything we could find from around the house, hotel soaps, crazy straws, hard candies, marsh mellows, Twinkies, Ho Hos, and popcorn. If you want to put real prizes in it you can, but we were sticking with our thrifty and cheap theme. Streamers in red, blue, and Winnie the Pooh, coming off the end finished off the festive look. Use what you have on hand and get a laugh out of it!


This is definitely one of those party themes you just want to take to the max and have fun with. Get your guests to dress up, play funny games, eat stereotypical "redneck" food. This could easily morph from a theme for a birthday party, to a baby shower, or even an Christmas party! Finally, I highly suggest checking out the Pinterest board I put together because it has some really great game ideas, ideas for decorations, and resources for if you don't want to make your own items.

Now before you go, don't forget to....


P.S.
Yes, those are shotgun shells I'm using a curlers. And guess what? They worked too!

Shared with:
Fabulously Creative Friday
Flaunt it Friday
Inspire Me Please
Feathered Nest Friday
The Inspiration  Exchange